3 Easy Ways to Improve Your Home Studio Acoustics

You do not need to be an acoustician to improve the sound of your room. While acoustics is a complex science, getting better results does not always require complex calculations or a huge budget. A few simple, affordable changes can make a huge difference in your listening environment. Here are three easy places to start.
Set Up Your Listening Position Properly
One crucial element, yet one that is often overlooked, is the proper placement of the listening position in your room.
It is usually best to set up your listening position so that your monitors fire down the length of the room. The listening position itself should be offset toward one end or the other. Placing the listener’s position—or, more simply, the chair!—at about one third of the room’s length is usually an excellent starting point.
Across the width of the room, the listening position should ideally be centered. Whenever possible, the walls on either side of your monitors should have a similar structure. If the room is not a regular shape, choose a spot where the listening position can be as centered as possible between the existing walls. Also pay attention to symmetry: avoid having a window, door, or shelving unit on only one side of the listening position.

Of course, it is not always easy to follow these rules, especially when you have to set up a studio in an existing room. In that case, test each possible location and choose the one that gives you the best results.
If you have only one possible location—which is often the case when setting up in a bedroom, for instance—you will almost certainly need to spend more time experimenting with the placement of your acoustic panels. Patience and effort will help you get the best possible performance from the space you have.
Place Your Monitors Carefully
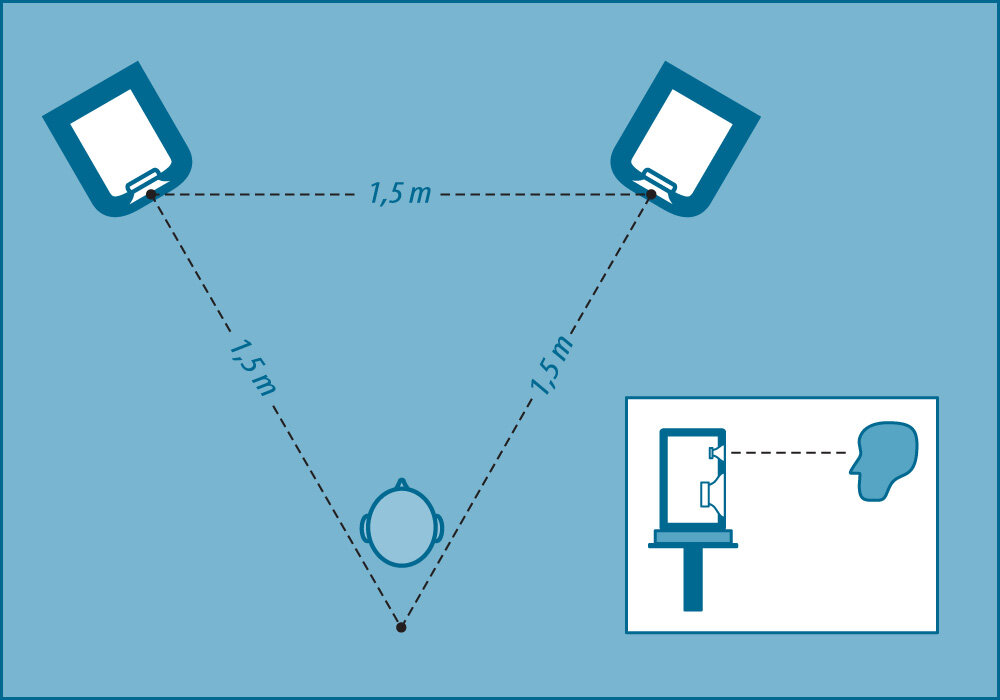
Monitor placement is based on a simple, proven principle: the two speakers and the listener should form an equilateral triangle. Unless the manufacturer recommends otherwise, start with about 1.5 meters, or 5 feet, between the listener and each tweeter, and the same distance between the two tweeters. Then aim the monitors toward the listening position.
Calculating the distance between the listener and the monitors can be a little confusing. The natural reflex is to place the tip of the triangle right at your forehead. In practice, it should be about 6 inches behind your head. This helps limit the frequency variations that occur when you move, for example to reach for a keyboard controller, your audio interface, or the EQ settings on a console.
As for height, the tweeters should generally be at eye level, though it is still a good idea to check the manufacturer’s recommendations.
Do not underestimate this step. Proper monitor placement can make a huge difference in what you actually hear. Measure carefully—this is not the place to eyeball it.
Tame the First Reflections
First reflections are the reflections that bounce off nearby surfaces—walls, ceiling, or desk—and reach your ears shortly after the direct sound from the monitors. These reflections cause phase problems at the listening position, affecting both frequency balance and the stereo image. Taming first reflections with absorptive acoustic material is a fundamental step toward getting better results.
A simple way to locate these reflections is to use a mirror. One person sits at the listening position while another moves the mirror along the wall. As soon as the seated person can see a monitor in the mirror, the other person marks that spot on the wall with chalk. Once this process has been repeated on the walls and ceiling, place the absorptive acoustic material over the areas marked in chalk, where the speakers were visible in the mirror.
If you are handy, you can easily build your own absorptive acoustic panels. Most designs use a wooden frame filled with rock wool and covered with fabric—and you can find plenty of examples online. This way, you can make sure the panels meet your exact needs, at a much lower cost than ready-made solutions.
Pitfalls to Avoid
Trying to Correct Acoustic Problems with an EQ on the Master Bus
Let’s use an example. After careful listening, you notice a buildup around 125 Hz in your room. You attack the problem by applying a 12 dB cut with an equalizer placed on the master bus. You test again: perfect! Problem solved!
A few weeks later, you drive to the mastering studio to deliver your final mixes. On the way there, you notice that your mixes have a little too much bass in your car. Oh well—who can trust the sound in a car anyway? Once at the studio, you give your mixes to the engineer, who offers to play them back while you’re there. Disaster! Your low end is not only too loud, but also completely muddy.
Of course it is. Your EQ move has completely removed from your studio a frequency that exists everywhere else. You end up with the exact opposite of what you were trying to achieve: 125 Hz and the surrounding frequencies are now overrepresented as soon as you leave your studio. So unless you plan to invite every potential listener to come hear your work in your studio, using an EQ will only make the existing problem worse.
That said, some monitors and monitoring systems include DSP-based room correction. These systems can be useful for optimizing the speaker-room interaction at the listening position, especially in the low end. But they do not replace proper monitor placement or acoustic treatment. Room correction works best as a final adjustment, not as a substitute for fixing the room itself.
Gluing Foam Acoustic Panels to the Walls
Many foam acoustic panels come with adhesive so they can be glued to the walls. Don’t! Use screws, pins, or thumbtacks instead. That way, if you ever need to move your listening position, you will be able to reuse your panels and avoid damaging your walls.
It is also worth noting that foam acoustic products are significantly less effective than panels made from denser material. They tend to affect only the upper end of the frequency spectrum and therefore do not provide enough coverage to properly treat the lower end of your acoustic space. It is definitely better to invest in more effective absorptive acoustic panels—or to build them yourself.
Removing All the Furniture
Everything in a room affects its acoustics, so avoid stripping your studio down to an empty space. Instead, use the furniture to your advantage. A sofa is not only great for your clients—it also works as an excellent absorber. Bookshelves are visually appealing and can act as effective diffusers. Empty rooms are not very inviting anyway, and they usually sound terrible.
If you want to go further, Primacoustic has an excellent video series that explains acoustics clearly, without making it feel like dark art—or a sales pitch for acoustic panels. You’ll find the link here.
I do not claim to be an acoustician. But I can tell you this: these simple steps can make a real difference and help your mixes translate better everywhere else.